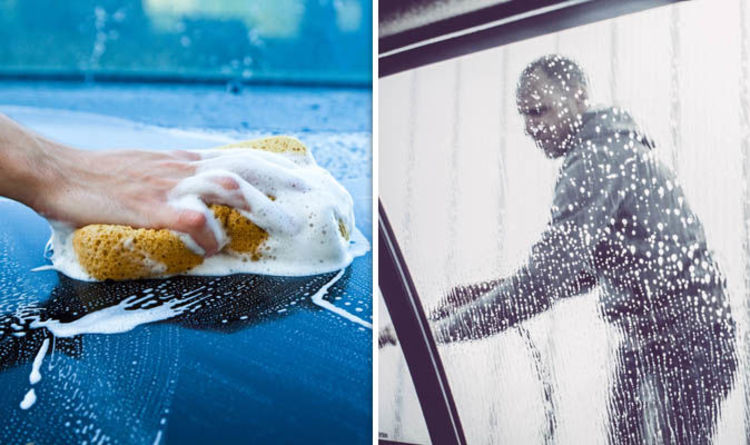
Taking care of your car goes beyond just routine maintenance; it’s about preserving its appearance and overall value. One of the most impactful and satisfying ways to do this is through regular car washes. Sure, you could visit a professional car wash, but there’s something uniquely rewarding about rolling up your sleeves and giving your vehicle a thorough cleaning yourself. It’s an opportunity to connect with your car, identify potential issues early on, and save some money in the process.
Many believe that a simple rinse is enough, but a proper car wash involves a series of steps designed to remove dirt, grime, and other contaminants that can damage your car’s paint over time. From choosing the right cleaning solutions to employing the correct washing techniques, there’s a lot to learn about achieving a professional-quality finish at home. The good news is that with a little guidance and the right tools, anyone can master the art of the DIY car wash.
Imagine the satisfaction of stepping back and admiring your sparkling clean car, knowing that you put in the effort to achieve that showroom shine. No more water spots, no more lingering dirt, just a gleaming vehicle that reflects your care and attention. It’s not just about aesthetics; it’s about protecting your investment and ensuring that your car looks its best for years to come.
This comprehensive guide will walk you through every step of the process, from gathering your supplies to applying the finishing touches. We’ll cover the essential tools, the best cleaning products, and the most effective techniques for washing, drying, and detailing your car. Whether you’re a seasoned car enthusiast or a complete beginner, you’ll find valuable tips and insights to help you achieve professional-quality results at home.
Get ready to transform your car washing routine and discover the joy of a truly clean vehicle. This is the beginning of your journey to understanding and perfecting **the ultimate guide to a DIY car wash**. Now let’s dive into the specifics of how to achieve a spotless, gleaming finish without breaking the bank.
Gathering Your Supplies: Setting the Stage for Success
Essential Cleaning Tools
Before you even think about getting your car wet, it’s crucial to have the right tools on hand. This will not only make the process more efficient but also minimize the risk of scratching or damaging your car’s paint. Think of it like preparing your canvas before painting a masterpiece.
The foundation of any good car wash starts with two buckets. Yes, two! One bucket is for your soapy wash solution, and the other is for rinsing your wash mitt. This “two-bucket method” prevents you from transferring dirt and grime back onto your car’s surface. Grit guards, placed at the bottom of each bucket, further help to trap dirt particles and keep your wash water clean.
A high-quality wash mitt is another essential tool. Microfiber mitts are generally preferred because they are soft, absorbent, and effectively trap dirt without scratching the paint. Avoid using sponges, as they tend to trap dirt particles and can easily cause swirl marks.
A good car wash soap is crucial. Look for pH-balanced formulas specifically designed for automotive use. These soaps are formulated to gently lift dirt and grime without stripping away wax or other protective coatings. Avoid using dish soap, as it can be too harsh and can damage your car’s finish.
Finally, a hose with a spray nozzle is necessary for rinsing. Opt for a nozzle with adjustable spray patterns, allowing you to control the water pressure and coverage. A pressure washer can be helpful for pre-rinsing and removing stubborn dirt, but be cautious and use a wide nozzle to avoid damaging the paint.
Choosing the Right Cleaning Products
Selecting the right cleaning products can be a daunting task, with countless options available on the market. However, understanding the different types of products and their intended uses can make the process much easier.
As mentioned earlier, a pH-balanced car wash soap is essential. Look for soaps that are specifically formulated for automotive use and avoid using household cleaners, which can be too harsh and damaging. Pay attention to the dilution ratios recommended by the manufacturer to ensure optimal cleaning performance.
For removing stubborn stains, such as bird droppings or tree sap, consider using a dedicated bug and tar remover. These products are formulated to safely dissolve these contaminants without harming the paint. Always follow the manufacturer’s instructions carefully and test the product in an inconspicuous area before applying it to the entire car.
Wheel cleaners are another important consideration. Brake dust and road grime can quickly accumulate on your wheels, making them look dull and dirty. Choose a wheel cleaner that is specifically designed for your type of wheels (e.g., painted, chrome, or alloy).
Finally, don’t forget about tire shine. Applying tire shine after washing your car can give your tires a rich, dark, and glossy appearance, enhancing the overall look of your vehicle. Choose a tire shine product that is appropriate for your tires and follow the manufacturer’s instructions carefully.
Additional Items for Convenience
While the essentials are crucial, a few additional items can make your car washing experience more convenient and enjoyable. These items can streamline the process and help you achieve a more professional-quality finish.
Microfiber drying towels are a must-have for drying your car after washing. These towels are super absorbent and gentle on the paint, minimizing the risk of water spots and swirl marks. Opt for waffle-weave towels, which are particularly effective at absorbing water.
A detailing brush can be useful for cleaning hard-to-reach areas, such as the vents, crevices, and around the emblems. Choose a soft-bristled brush to avoid scratching the paint or other surfaces.
A foam applicator pad is ideal for applying wax or sealant to your car’s paint. These pads are soft and evenly distribute the product, ensuring a smooth and consistent application.
Finally, a quick detailer spray can be used to remove light dust and fingerprints between washes. This product can also be used to enhance the shine and protect your car’s paint.
Pre-Washing Prep: Setting the Stage for a Spotless Finish
Choosing the Right Location and Time
The location and time of your car wash can significantly impact the results. Washing your car in direct sunlight can cause the soap to dry too quickly, leading to water spots and streaks. It’s best to wash your car in a shaded area or during the cooler parts of the day, such as early morning or late afternoon.
Make sure you have access to a water source and a drain. Avoid washing your car on gravel or dirt, as this can introduce contaminants that can scratch the paint. A paved driveway or a grassy area is ideal.
Consider the weather forecast before you start washing your car. Avoid washing your car if rain is expected, as this will undo all your hard work. Windy conditions can also be problematic, as they can blow dirt and debris onto your car’s surface.
Before you start, take a few minutes to clear the area around your car. Remove any obstacles that might get in your way, such as toys, tools, or lawn furniture. This will ensure that you have plenty of space to move around and work comfortably.
Finally, gather all your supplies and place them within easy reach. This will save you time and effort during the washing process.
Pre-Rinsing for Optimal Dirt Removal
Pre-rinsing your car is an essential step that helps to remove loose dirt and debris before you start washing. This will minimize the risk of scratching the paint during the washing process.
Use a hose with a spray nozzle to thoroughly rinse your car from top to bottom. Pay particular attention to areas that tend to accumulate dirt, such as the wheel wells, rocker panels, and bumpers.
If you have a pressure washer, you can use it to pre-rinse your car. However, be cautious and use a wide nozzle to avoid damaging the paint. Maintain a safe distance from the car’s surface and avoid spraying directly at sensitive areas, such as the windows and mirrors.
For areas that are particularly dirty, you can use a pre-soak solution. Apply the pre-soak solution to the affected areas and let it dwell for a few minutes before rinsing it off. This will help to loosen the dirt and grime, making it easier to remove during the washing process.
After pre-rinsing, inspect your car for any stubborn stains or contaminants. If you find any, treat them with a dedicated bug and tar remover before proceeding to the washing stage.
Tire and Wheel Prep
Your tires and wheels often accumulate the most dirt and grime, so it’s best to clean them before washing the rest of your car. This will prevent the dirty water from splashing onto your freshly washed paint.
Start by rinsing your tires and wheels with water to remove loose dirt and debris. Then, apply a wheel cleaner specifically designed for your type of wheels. Follow the manufacturer’s instructions carefully and allow the wheel cleaner to dwell for the recommended time.
Use a wheel brush to scrub the tires and wheels, paying particular attention to the lug nuts and brake calipers. Rinse thoroughly with water.
For stubborn brake dust, you may need to use a more aggressive wheel cleaner. However, be cautious and test the product in an inconspicuous area before applying it to the entire wheel.
After cleaning your tires and wheels, you can apply a tire shine product to give them a rich, dark, and glossy appearance.
The Washing Process: Achieving a Spotless Clean
The Two-Bucket Method Explained
The two-bucket method is a fundamental technique for washing your car without scratching the paint. It involves using two separate buckets: one for soapy wash solution and one for rinsing your wash mitt.
Fill one bucket with car wash soap and water, following the manufacturer’s instructions for dilution ratios. Fill the other bucket with clean water. Place grit guards at the bottom of each bucket to trap dirt particles.
Dip your wash mitt into the soapy wash solution and gently wash a section of your car. Then, rinse the mitt thoroughly in the clean water bucket before dipping it back into the soapy wash solution.
This process ensures that you are not transferring dirt and grime back onto your car’s surface, minimizing the risk of scratches and swirl marks.
Change the water in both buckets frequently, especially if it becomes dirty.
Washing Techniques: Top to Bottom
When washing your car, it’s best to start at the top and work your way down. This prevents dirty water from dripping onto areas you’ve already cleaned.
Begin by washing the roof of your car, followed by the hood, trunk, and windows. Then, move on to the side panels, doors, and bumpers.
Use gentle, overlapping strokes when washing your car. Avoid applying excessive pressure, as this can scratch the paint.
Pay particular attention to areas that tend to accumulate dirt, such as the lower panels and wheel wells.
Rinse each section of your car thoroughly after washing to remove all traces of soap.
Rinsing for a Streak-Free Finish
Rinsing your car thoroughly is crucial for achieving a streak-free finish. Any soap residue left on the paint can dry and leave behind unsightly water spots.
Use a hose with a spray nozzle to thoroughly rinse your car from top to bottom. Pay particular attention to areas where soap tends to accumulate, such as the crevices and around the emblems.
If you have hard water, consider using a water softener or a deionized water system to prevent water spots.
You can also use a sheeting technique to minimize water spots. This involves removing the spray nozzle from the hose and allowing the water to sheet off the car’s surface.
After rinsing, inspect your car for any remaining soap residue. If you find any, rinse the affected areas again.
Drying Your Car: Preventing Water Spots and Swirl Marks
Microfiber Towels: Your Best Drying Friend
Using the right drying towels is essential for preventing water spots and swirl marks. Microfiber towels are the best choice because they are super absorbent and gentle on the paint.
Opt for waffle-weave microfiber towels, which are particularly effective at absorbing water.
Avoid using old towels or terry cloth towels, as they can scratch the paint.
Before drying your car, make sure your microfiber towels are clean and free of any dirt or debris.
Dry your car in a shaded area to prevent water spots from forming.
Drying Techniques: Minimizing Swirls
When drying your car, use gentle, patting motions instead of rubbing. Rubbing can create swirl marks, especially if there are any small particles of dirt on the paint.
Start at the top of your car and work your way down, drying each section thoroughly before moving on to the next.
Use a separate microfiber towel for drying the wheels and tires to prevent transferring brake dust and grime to the paint.
For hard-to-reach areas, such as the crevices and around the emblems, use a detailing brush or a smaller microfiber towel.
After drying your car, inspect it for any water spots or streaks. If you find any, use a quick detailer spray to remove them.
Air Drying Alternatives: Blow Dryers and More
While microfiber towels are the most common method for drying a car, there are alternative options available.
Air dryers, specifically designed for car detailing, can be used to blow water off the car’s surface. These dryers use warm, filtered air to dry the paint quickly and effectively.
Another alternative is to use a leaf blower to blow water off the car’s surface. However, be careful not to scratch the paint with the nozzle of the leaf blower.
Some car enthusiasts use a water blade to remove water from the car’s surface. Water blades are made of soft silicone and are designed to glide smoothly over the paint without scratching it.
Regardless of the method you choose, it’s important to dry your car thoroughly to prevent water spots from forming.
Detailing Touches: Enhancing the Shine and Protection
Waxing for Protection and Shine
Waxing your car is an essential step for protecting the paint and enhancing its shine. Wax creates a barrier between the paint and the environment, shielding it from UV rays, acid rain, and other contaminants.
Choose a wax that is appropriate for your car’s paint and your desired level of protection. There are several types of waxes available, including carnauba wax, synthetic wax, and hybrid wax.
Before waxing your car, make sure the paint is clean and dry. You may also want to clay bar your car to remove any embedded contaminants.
Apply a thin, even layer of wax to your car using a foam applicator pad. Follow the manufacturer’s instructions for application and buffing.
Buff the wax off your car using a clean microfiber towel. Use gentle, circular motions to remove the wax and reveal a glossy shine.
Interior Cleaning: Don’t Forget Inside
While exterior cleaning is important, don’t forget about the interior of your car. A clean interior can make your driving experience much more enjoyable.
Start by vacuuming the carpets, seats, and floor mats. Use a crevice tool to reach hard-to-reach areas.
Wipe down the dashboard, door panels, and center console with a microfiber cloth and an interior cleaner.
Clean the windows and mirrors with a glass cleaner.
For leather seats, use a leather cleaner and conditioner to keep them supple and protected.
Final Touches for a Showroom Finish
After washing, drying, and waxing your car, there are a few final touches you can add to achieve a showroom finish.
Apply tire shine to your tires to give them a rich, dark, and glossy appearance.
Use a quick detailer spray to remove any water spots or streaks that may have formed.
Clean the windows and mirrors one last time to ensure they are streak-free.
Inspect your car for any remaining dirt or grime. If you find any, remove it with a microfiber cloth.
Stand back and admire your sparkling clean car!
This **ultimate guide to a DIY car wash** helps you to make your car clean and beautiful.
Maintenance and Upkeep: Keeping Your Car Clean Longer
Regular Washing Schedules: Prevention is Key
The key to keeping your car looking its best is to establish a regular washing schedule. The frequency of your washes will depend on factors such as the weather conditions, the amount of driving you do, and your personal preferences.
As a general guideline, you should wash your car at least once every two weeks. If you live in an area with harsh weather conditions, such as salt-covered roads in the winter, you may need to wash your car more frequently.
Regular washing not only keeps your car looking clean but also helps to protect the paint from damage caused by dirt, grime, and other contaminants.
Consider setting a reminder on your phone or calendar to remind you to wash your car regularly.
By incorporating regular washing into your routine, you can ensure that your car always looks its best.
Quick Detailing Between Washes
Even with a regular washing schedule, your car can still accumulate dust, fingerprints, and other minor blemishes between washes. This is where quick detailing comes in handy.
Quick detailing involves using a quick detailer spray and a microfiber cloth to remove light dust and fingerprints.
Simply spray the quick detailer onto the affected area and wipe it clean with a microfiber cloth.
Quick detailing can be done in just a few minutes and can help to keep your car looking clean and polished between washes.
Keep a bottle of quick detailer spray and a microfiber cloth in your car for easy touch-ups on the go.
Protecting Your Car from the Elements
In addition to regular washing and quick detailing, there are several other steps you can take to protect your car from the elements.
Park your car in a garage or carport whenever possible to protect it from the sun, rain, and snow.
Use a car cover to protect your car from dust, dirt, and scratches when it is parked outdoors.
Apply a sealant or wax to your car’s paint to provide an extra layer of protection.
Inspect your car regularly for any signs of damage, such as scratches, dents, or rust. Address any issues promptly to prevent them from worsening.
By taking these steps, you can help to prolong the life of your car’s paint and keep it looking its best for years to come.
You now are on **the ultimate guide to a DIY car wash**, use it wisely to have a beautiful car
Conclusion: Explore More Car Care Tips
Congratulations! You’ve now mastered the art of **the ultimate guide to a DIY car wash**. From gathering your supplies to applying the final detailing touches, you have the knowledge and skills to achieve a professional-quality finish at home. Remember, taking the time to properly wash and detail your car is not only about aesthetics; it’s about protecting your investment and ensuring that your vehicle looks its best for years to come.
We hope this guide has been informative and helpful. However, car care is a vast and ever-evolving field. There’s always more to learn and new techniques to discover. We encourage you to continue exploring and experimenting to find what works best for you and your car.
Don’t be afraid to try new products, experiment with different techniques, and seek advice from other car enthusiasts. The more you learn, the better you’ll become at caring for your car.
And remember, consistency is key. A regular washing and detailing routine will keep your car looking its best and protect it from the elements.
If you enjoyed this article and found it helpful, be sure to check out our other articles on car care and maintenance. We cover a wide range of topics, from engine maintenance to interior detailing, so there’s sure to be something for everyone. Happy detailing!